LEGO Donkey Kong

Video 1 (front) - Video 2 (rear)
Background
During a random discussion at the April NELUG meeting, Robyn (my wife and muse) off-handedly said, "You should make Donkey Kong!" As is her way, she followed this remark with a brief musical rendition, firmly planting the idea in my skull.The Goal
Donkey Kong is a classic, so I wanted my MOC to do it justice. At a minimum it would need to have:- rolling barrels (using LEGO barrels if possible)
- Donkey Kong throwing the barrels
- a barrel-jumping minifig
- ladders and ramps that closely resembled the originals
The Design

The Players
Mario and Pauline would obviously be minifigs. But what about Donkey Kong? I'm no Count Blockula, so making a brick-built DK at a reasonable size was not likely. But with its TECHNIC-friendly modular construction, the troll from the new CASTLE line fit the bill nicely.
The Wall
The image to the right was my guide. I noted that the ramps are made up of "caret" sections. Mario appears to be roughly two carets wide. A minifig is nominally two studs wide. Joy! Vertically I tried using one plate == one ladder rung. Judging from the picture, this meant a two-plate space between rungs. To make the sides of the ladders look right I'd simply use SNOT. No problem. I built a test ladder and was pleasantly surprised by how close a minifig matched the proportions. This scale also managed to support my desire to use TECHNIC beams for the front of the ramps. To figure the ramp placement I turned to MLCad. Counting carets, my ramps would be 26 studs long. I did a mock up using two ladders (4- and 6-rung) and two ramps to get the proper slope. A "brick wall" was then built behind the ramps to determine plate-level mounting points. I stayed in MLCad for the next challenge: Figuring out all of the SNOT details for the ladders. I wanted to keep the relative ladder positions in line with my reference image, while minimizing any floaters. I did pretty well; there is only one floating section in the whole MOC. Can you spot it?

Motion
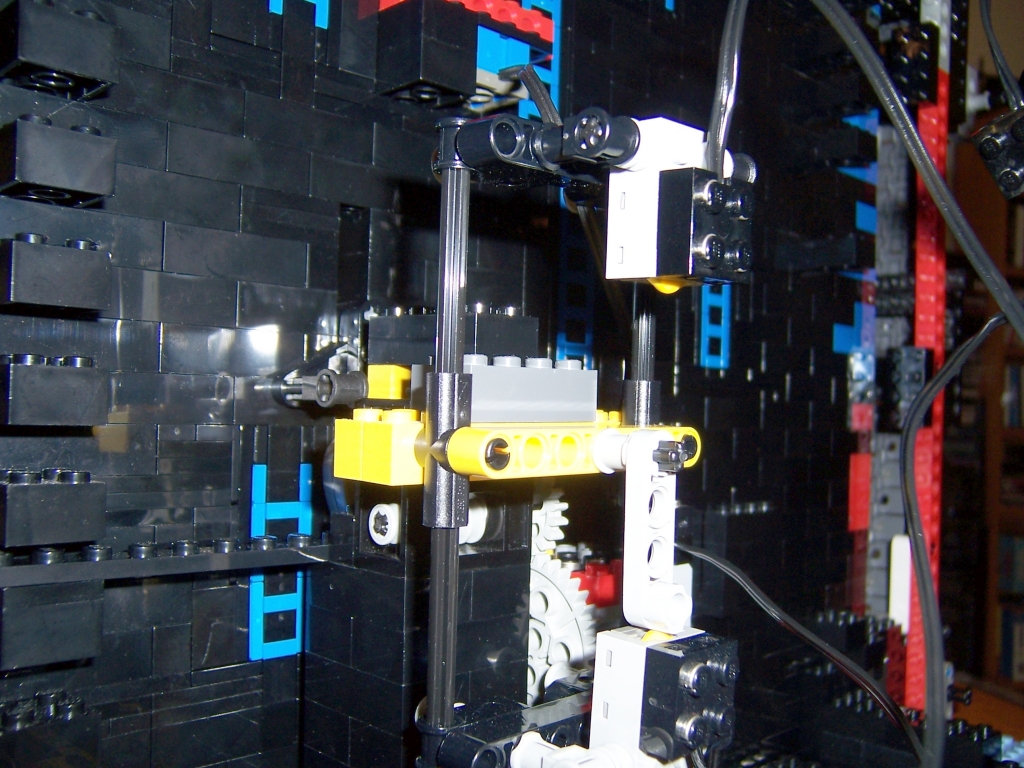
With the wall basically planned out, it was time to tackle the motion. First up was the barrel elevator. This was basically reused from my earlier Plinko GBC module. New-style TECHNIC treads fitted with 3L axle with studs in every-other link. Needing an even number of treads left me with a fair amount of slack. Thanks to Tom Atkinson for suggesting the idler wheel (without knowing it)! Next was the jumping minifig. I needed something that would slide up and down easily, stay in the wall, and somehow attach to a minifig, all while being as minimal as possible. After a bit of trial and error, my eventual solution was a combination of TECHNIC triangles, 1x3 liftarms (to fill the 2-stud wall depth), and 3/4 pins holding a 4L bar.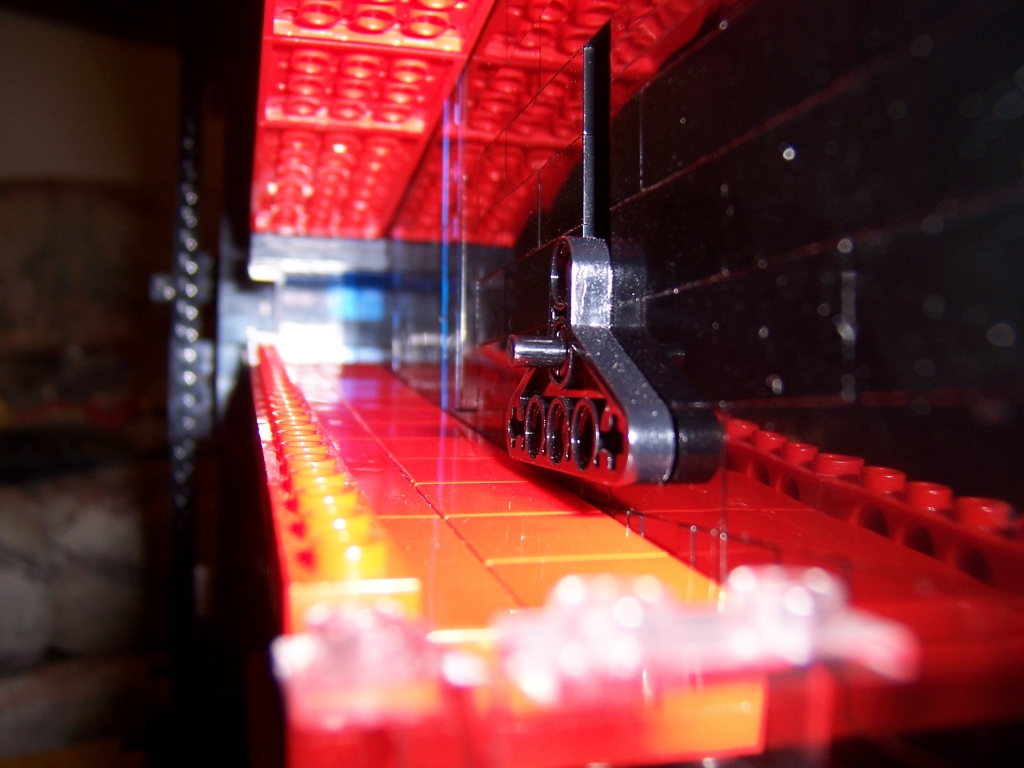
The desire for a smooth jumping motion lead me to finally discover the purpose of a TECHNIC cam. :-) The cam worked well against the TECHNIC triangle to produce a pleasant effect.

 For a touch of realism, I wanted DK's arm to swing back and forth rather than
just go round in a circle. The May NELUG meeting provided a
fortuitous encounter with Bill Bourn and his GBC pumps, where
I saw a useful mechanism for converting continuous rotary motion to
oscilating
linear motion. (Thanks Bill!) A few gears and calculations and Donkey Kong was throwin'!
For a touch of realism, I wanted DK's arm to swing back and forth rather than
just go round in a circle. The May NELUG meeting provided a
fortuitous encounter with Bill Bourn and his GBC pumps, where
I saw a useful mechanism for converting continuous rotary motion to
oscilating
linear motion. (Thanks Bill!) A few gears and calculations and Donkey Kong was throwin'!Once I had prototypes of each mechanism it was time to build them into the model. The bulk of the model is essentially a 2-stud thick wall. I built out the base for a little stability, and tried to throw in some well placed attachment points for the mechanics.
Annoyances
Barrels
I made the ramps 4 studs deep - 3 studs to accomodate the barrel plus 1 row of TECHNIC bricks forming a small frontal lip. My initial design used standard minifig barrels topped with a 2x2 round plate and a 2x2 round tile. These looked good but proved to be functionally lacking. If the tile was facing the wall, the slits on the bottom of the barrel had a tendency to get caught on the lip. If the tile faced the TECHNIC beam, the bottom would often snag on the minor wall face imperfections caused by the ladder SNOT. Either scenario inevitable lead to a jam requiring manual intervention. When I debuted the MOC at the July NELUG meeting (Yay UNO's!), this is the barrel style I used.Another problem was momentum. Even with a small slope, the rolling barrels would overshoot the ramp below. This was easily solved by adding simple barriers made from 1x2 window panels. The panels facing the wall serve a dual purpose. First, they help to ensure the barrels land "inside" the next ramp. Second, without them, the barrels tended to bounce and land upright, again requiring manual intervention.
Jumping
For reasons of simplicity, I set it up so that Mario jumped continuously. If a barrel passed him at the peak of his jump, no problem. Landing on a barrel was not a problem either as it would (usually) begin to roll again when the next jump started. If the barrel hit while Mario was down, however, the TECHNIC triangle would hit the barrel and tweak it just enough that it would jam. The impact from the next barrel would occasionally knock it straight and clear the jam, but more often it would just stop behind it. My work-around for this was to disable the jumping, leaving the minifig parked at the peak of his jump. Kind of defeats the purpose.Improvements
I thought that four months was enough time spent on this thing, so I intended to leave the Uno's version as final. My stupid ego was hung up on the jumping issue, though, so I spent the next couple of weeks making improvements.
Barrels
I give up on the minifig barrel and switched to the following design. It loses points for style, but gains them back for reliability. Having tiles on both sides virtually elimated the wedged barrel problem, though it does still happen on occasion. (Like at the very end of the YouTube clip. D'oh!!)Jumping
I bought an RCX when they first came out and this is my first MOC to finally use it. I've got an NXT now, too; hopefully it won't take me 8 years to use _that_. But I digress..To avoid sensor-induced log jams, the obvious choice was to use a light sensor to detect passing barrels and initiate a jump. I measured a complete jump cycle (from landing to landing) to be 1.7s at full motor power. A quick experiment gave me the optimal sensor placement such that the barrel would reach Mario at the peak of his jump, thus passing under him with room to spare. But what to do if a second barrel passes the sensor while he's already jumping? The arcade allowed him to jump multiple barrels; the MOC should too. I tried various things and decided on the following algorythm.
Wait for barrel detection;I'm using touch sensors to detect the "peak height" and "landed" states, stopping the motor with "Float" at the peak and "Brake" at the landing. It works well enough for me to consider it finished.
Already jumping?
No: Jump.
Yes: Past peak height yet?
No: Pause 1s at peak height.
Yes: Get hit by barrel. Die.
Music
Since I'd already added the RCX, I figured I might as well go one step further and add some music. I found a MIDI version of the intro tune and diligently transcribed the notes to a series of "PlayTone" and "Wait" commands in the RCX code.Conclusion
Overall I'm pleased with the way it turned out. I enjoyed tinkering with TECHNIC, finally got some use out of my RCX, and I now have something for the NELUG Amusement Park. :-D Thanks again to those who provided assistance or inspiration along the way (whether you knew you were helping or not).
 -Dan Kressin, 7 August 2008