Mini LEGO Donkey Kong
Video
Background
After completing my previous Donkey Kong, some fellow NELUG'ers challenged me to build it smaller. So I did.The Goal
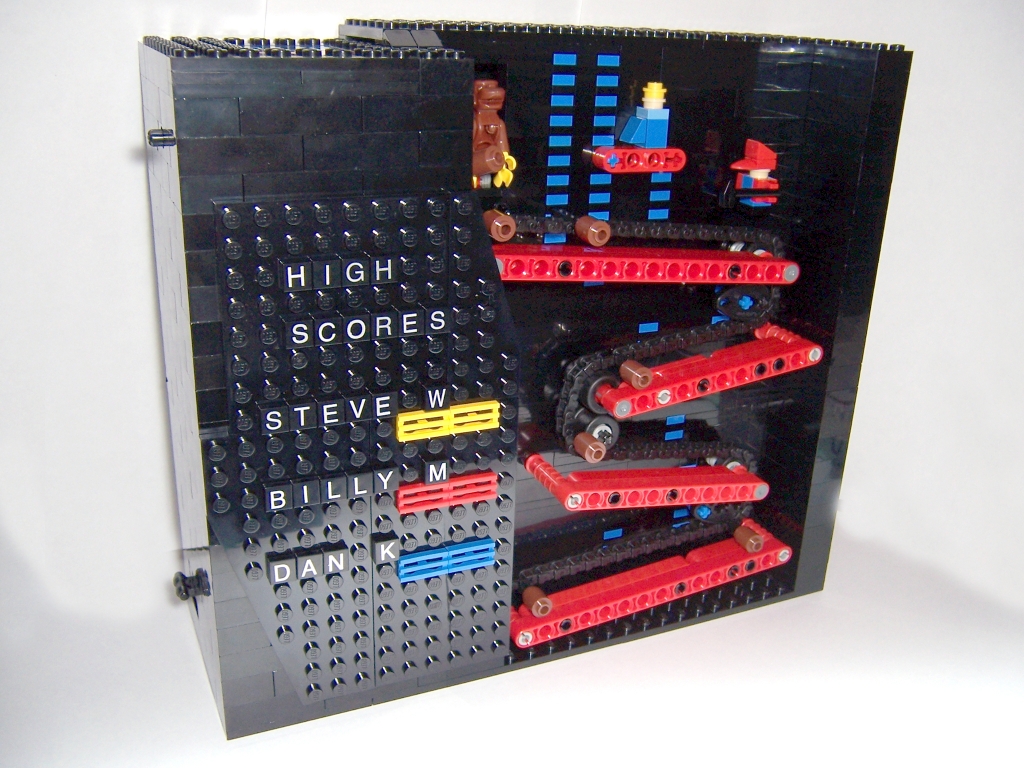
Recreate the previous model smaller, keeping as many features and functions as possible. The target size was 30-40 studs long, 8 studs wide, and maybe 10" high.Challenges
The Barrels and Ramps
Using 1x1 round bricks for the barrels was pretty much a gimme.
The challenge was how to give them motion. Early testing convinced me
that having loose barrels simply wasn't going to work. 1x1's bounce
way too much and there was no way to prevent them landing any way
but on their side (which is the only way they'd roll). Luckily,
LEGO designs each of their pieces to play well with others. Case in
point, a 1x1 round brick fits nicely on the end of a link tread.Unlike regular chain links, the link treads only bend one direction and they only accept gear teeth on the bottom. They can only be formed in a convex loop with the top of the tread facing outside. Substituting regular links for the bulk of the loop allowed the creation of the complex (concave) path required for the barrels. Using rubber tires in place of gears facilitated support through the back-bend in the loop.
The ramps were challenging for two reasons. First, they needed to be somewhat self-supporting while including a mechanism for the chain to ride. Second, I needed to figure out how to get a pleasing slope that also worked within TECHNIC dimensions. The solution I ended up with is actually not "in click" and is taking advantage of LEGO's inherent fudge factor. Due to the overal size goal, I opted to go with only 4 ramps instead of 6.
 Further
complication arose with controlling the tension of the chain
loop. Too little tension resulted in serious slipping of the
drive gear. Too much tension and the chain would break. My first
design used gears at all of the turning points. This proved difficult to drive
because the excess chain slack would gather immediately after the
drive gear. Through several iterations I ended up implementing
two major changes: Replacing all non-drive-gears with wheels/tires and
cams, and adding a tensioner to control the slack. The tensioner is a modified
version of the catapults from 10176
King's Castle. Whereas the catapult twists the rubberband, my
tensioner design stretches it.
Further
complication arose with controlling the tension of the chain
loop. Too little tension resulted in serious slipping of the
drive gear. Too much tension and the chain would break. My first
design used gears at all of the turning points. This proved difficult to drive
because the excess chain slack would gather immediately after the
drive gear. Through several iterations I ended up implementing
two major changes: Replacing all non-drive-gears with wheels/tires and
cams, and adding a tensioner to control the slack. The tensioner is a modified
version of the catapults from 10176
King's Castle. Whereas the catapult twists the rubberband, my
tensioner design stretches it.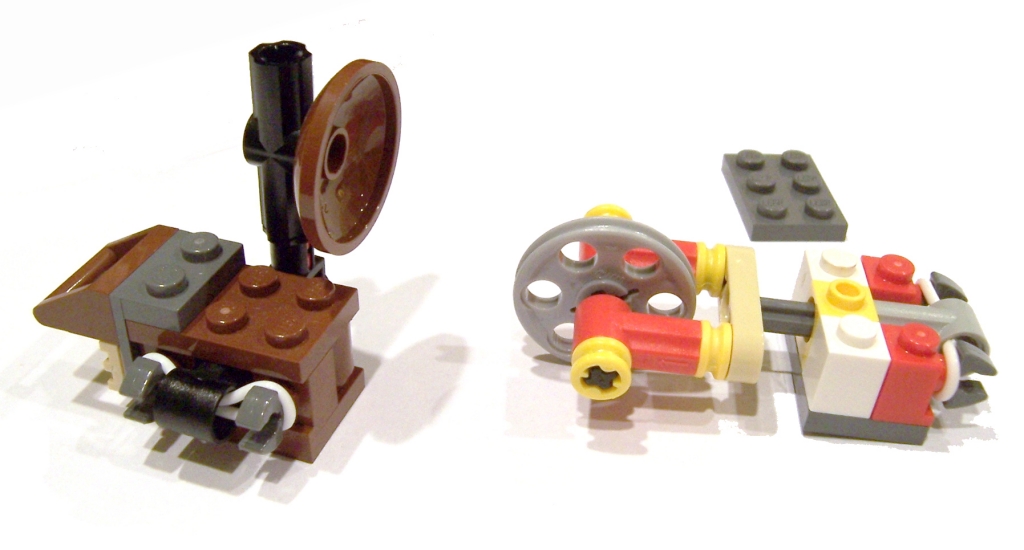
The Characters
 Donkey Kong
Using the minifig monkey was a no-brainer. But how to animate him? Of the 3 basic motions (pivot left-to-right, tilt side-to-side, swing forward/back), swinging forward and back was the easiest to accomplish without using a lot of precious space.
Mario/Jumpman and Princess/Pauline
Jumpman and Pauline were the last bits to be built. Both went through several iterations and I'm pretty happy with the final results.

(click to enlarge)
Functionality
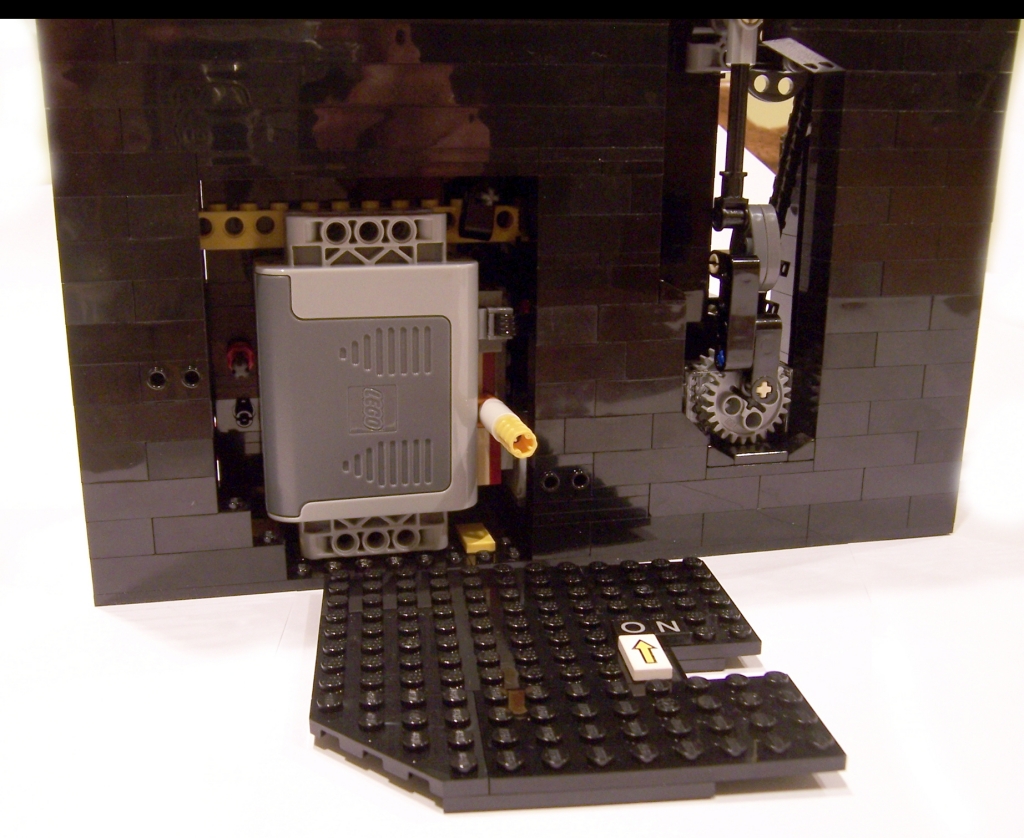
 The barrels and monkey bob are both controlled by a
single Power Functions Medium motor, powered by the regular PF battery
box. The motor drives a worm gear -> 24t gear gear box.
The 24t gear shares a single axle with the 40t drive gear and a second
24t gear that links to DK's movement. I added a stop block to the
motor connector to prevent the switch from being thrown in
reverse. Access panels cover the battery box and barrel
return. A sound brick from the 4958 Monster Dino
provides Kong's voice. (I left it as manually operated because it
gets annoying if heard too often.)
The barrels and monkey bob are both controlled by a
single Power Functions Medium motor, powered by the regular PF battery
box. The motor drives a worm gear -> 24t gear gear box.
The 24t gear shares a single axle with the 40t drive gear and a second
24t gear that links to DK's movement. I added a stop block to the
motor connector to prevent the switch from being thrown in
reverse. Access panels cover the battery box and barrel
return. A sound brick from the 4958 Monster Dino
provides Kong's voice. (I left it as manually operated because it
gets annoying if heard too often.) All moving parts can
be easily replaced without completely tearing apart the
model. (The red-tipped tool is used for removing the drive
axle through a door on the side. This allows the motor to be
removed through the rear access panel. The tool is stored in a
hidden compartment up top by the sound brick.)
All moving parts can
be easily replaced without completely tearing apart the
model. (The red-tipped tool is used for removing the drive
axle through a door on the side. This allows the motor to be
removed through the rear access panel. The tool is stored in a
hidden compartment up top by the sound brick.)


Conclusion
Like the previous model, I'm very happy with the end result. The final dimensions are 10 studs deep, 30 studs wide, 22 bricks (8.5") high. It took about a month to complete, once I finally started. It was a fun challenge to build to a smaller scale while keeping a lot of functionality. If you'd like to build your own Mini Donkey Kong, here's a mostly complete LDD file. Don't have LEGO Digital Designer yet? Download it here.Enjoy!
-Dan Kressin, 4 May 2009